The first step is to always setup your project. The link provided here will show you step-by-step how to do that. If you've already downloaded Devkitpro, then you can skip that step and focus on setting up the folder structure. This is something you'll do for every project so in later projects I'll just assume you've completed this step.
Cellular Automata
Have you ever heard of Stephen Wolfram? How about Wolfram Alpha? Well, Stephen Wolfram is a Computer Scientist/Physicist who created this thing called Wolfram Alpha where you can enter in math problems and instead of just returning the result, can return other maybe useful information as well. That's a really gross oversimplification, but I honestly don't know much about him or what he does, other than he really likes cellular automata. He even wrote a book called "A New Kind of Science." In it he goes over some basic cellular automata rules and really focuses on rule number 30 and why he thinks it's the most interesting. We'll get into what that means in a second. This section is simply about creating these cellular automata rules on the Gameboy Advance. It's actually really easy and if you've followed along with creating pixels, then all this section does is create pixels based on some rules.
Project Setup
Initial Code
Once everything is set up we're going to have our initial program look like this. If you've been following along then nothing here should look new or intimidating I hope. If it does, then I'd suggest you go back and refresh your memory on the previous stuff. If not, then Tally Ho!!!
It's basically all the code from the previous project where we moved a pixel around the screen. But I removed the lines in the while loop where we actually move the pixel, and I commented out where we draw the pixel for now. We don't actually move anything in this project, but we'll still want key presses to do other things like cycle through the cellular automata.
main.cpp
#define u16        unsigned short
#define vu16       volatile u16

#define REG_DISP   *(vu16*)0x04000000
#define VRAM        (vu16*)0x06000000

#define REG_KEY    *(vu16*)0x04000130
#define REG_VCOUNT *(vu16*)0x04000006

#define MASK_A      0x0001
#define MASK_B      0x0002
#define MASK_SELECT 0X0004
#define MASK_START  0x0008
#define MASK_RIGHT  0x0010
#define MASK_LEFT   0x0020
#define MASK_UP     0x0040
#define MASK_DOWN   0x0080
#define MASK_R      0x0100
#define MASK_L      0x0200


u16 color15(u16 r, u16 g, u16 b);

const int WIDTH = 240;
const int HEIGHT = 160;

int x = 120;
int y = 80;

int main() {
    REG_DISP = 0x0403;
    vu16 *vram = VRAM;
    vram[x + WIDTH * y] = color15(31, 0, 0);


    while(1) {
        while(REG_VCOUNT $gt= HEIGHT);
        while(REG_VCOUNT < HEIGHT);
        //vram[x + WIDTH * y] = color15(31, 0, 0);
    }

    return 0;
}

u16 color15(u16 r, u16 g, u16 b) {
    return r | g << 5 | b << 10;
}
Cellular Basics
The idea of creating "Cellular Automata" is fairly simple. You can check out the Wikipedia article about it for a deeper understanding. I'll just give you the cliff notes here. If you do visit the wiki page, then scroll down to the "Elementary cellular automata". That's what I'll be explaining here.
Automata Wiki
Elementary Cellular Automata
The main goal here is to build a pyramid-like shape of pixels in various patterns. We get those patterns by starting at the top and providing a "seed" pixel in the top row and at the midpoint in that row. Then we simply need to scan that row and decide whether to draw a pixel or not on the row below it. We do that by taking a group of 3 adjacent pixels on the row and determine the value by using basic binary calculation. We do that by determining which of those three pixels are "on" or "off". They are considered to be "on" if a pixel is drawn at that location. They are "off", if a pixel is not drawn at that location. You can see some examples on the right.
Basics
= 1
= 3
= 5
Next Generation
So once we've determined the value that the 3 groups of adjacent pixels in a row equal to (0-7), how do we use that to determine whether the pixel below it should be "on" or "off"? Well, there are 8 possible values (0-7) that the 3 pixels can add up to. So let's take an 8-bit binary number and assign each bit to each of the 8 possibilities.
Let's take the value 78 for example. In binary that is 01001110. So take a look below and see how we assign each bit to each possibility.
0
1
0
0
1
1
1
0
Overview
This is known as the "rule". In fact, the example above is "rule 78". There are therefore a total of 256 "rules". Some have more interesting results than others. For example, "rule 0" isn't particularly interesting.
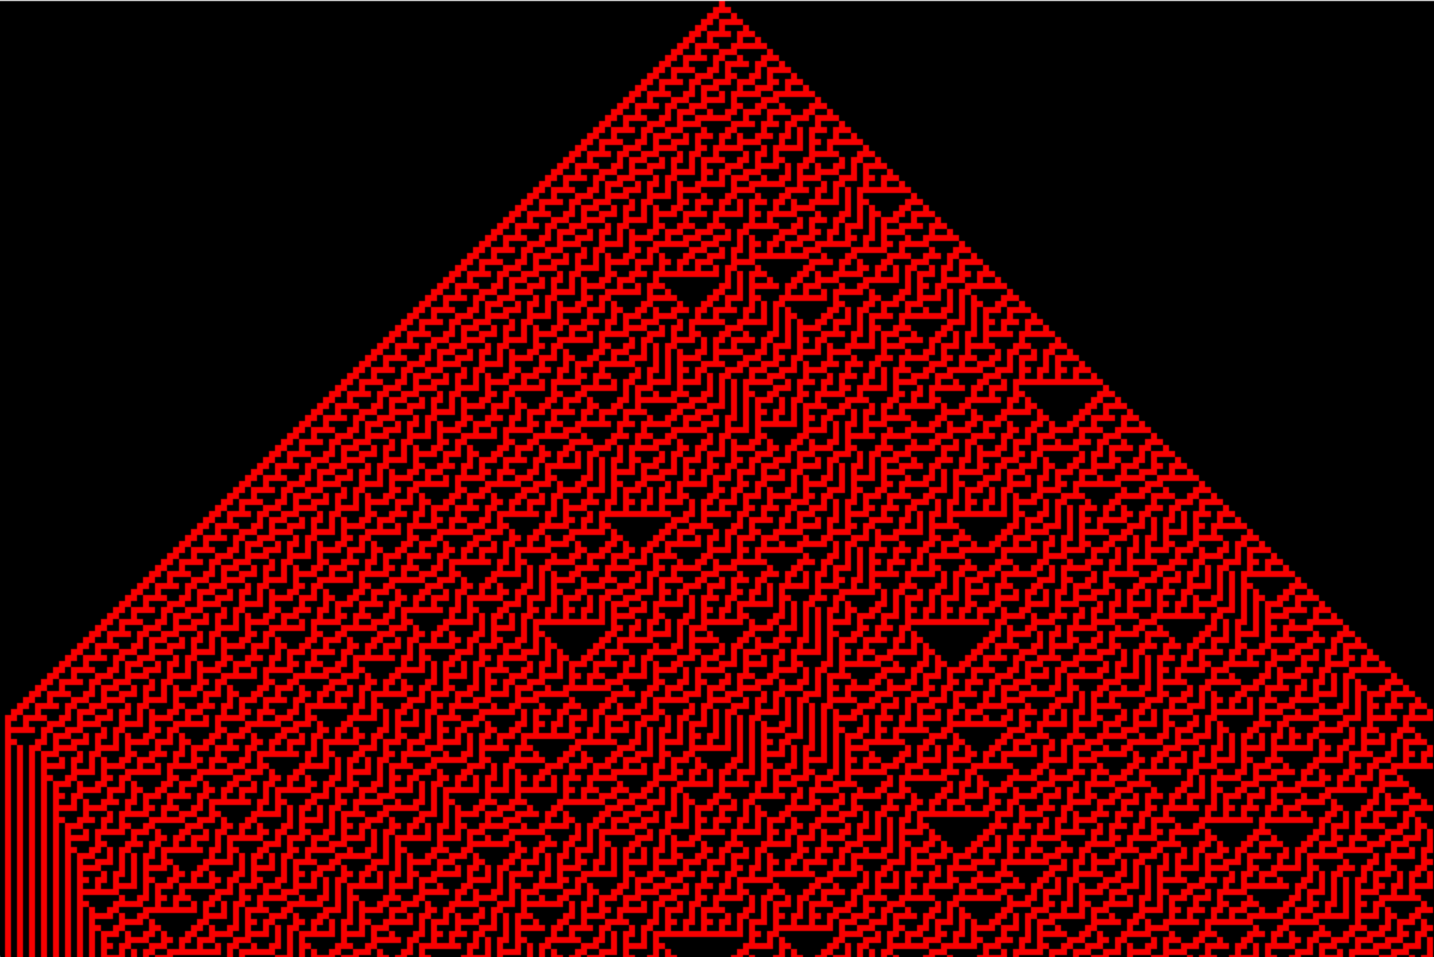
That's basically it. We start with a single pixel at the top middle row, then we go from row to row grouping 3 adjacent pixels together, determining their "value", then based on that value and the "rule" we'll either turn the pixel below it "on" or "off". We'll start with a blank screen where every pixel is turned "off", so we don't have to worry about turning a single pixel "off". Then we do that until the last row, and we'll be left with some interesting pyramid-like image. Cool?
Full Code
We start by defining a "rule" variable and setting it to anywhere between 0 and 255. Here, we're setting it to rule 30. We then set the pixel at position 120, which is the middle pixel in the top row to "on". We just assign it a color red. Then we'll have two embedded loops to go row-by-row starting at the top and moving to the second to last row. We don't need to go to the last row since there isn't anything below that row anyways. Then for each row we move column-by-column or pixel-by-pixel starting with the second pixel of each row and going to the second to last pixel of each row. That's because for each pixel we want to evaluate the pixel before and the pixel after because that's our group of 3. If those pixels are "on" or they have a color there, then we add a 1, 2, or 4. We then take that value and compare it to our "rule" and see if that bit is turned on in the rule. If it is, then we simply set that pixel to the color red. Finally, we break out of the while loop because we don't need to continue doing the same thing over and over again.
That's really it, pretty simple right? But you can get some pretty interesting patterns. You can modify the program so that if you press a button, say the R and L shoulder buttons you can see the previous or next "rule".
main.cpp
#define u16        unsigned short
#define vu16       volatile u16

#define REG_DISP   *(vu16*)0x04000000
#define VRAM        (vu16*)0x06000000

#define REG_KEY    *(vu16*)0x04000130
#define REG_VCOUNT *(vu16*)0x04000006

#define MASK_A      0x0001
#define MASK_B      0x0002
#define MASK_SELECT 0X0004
#define MASK_START  0x0008
#define MASK_RIGHT  0x0010
#define MASK_LEFT   0x0020
#define MASK_UP     0x0040
#define MASK_DOWN   0x0080
#define MASK_R      0x0100
#define MASK_L      0x0200


u16 color15(u16 r, u16 g, u16 b);

const int WIDTH = 240;
const int HEIGHT = 160;

int rule = 30;

int main() {
    REG_DISP = 0x0403;
    vu16 *vram = VRAM;
    vram[120] = color15(31, 0, 0);  //seed


    while(1) {
        while(REG_VCOUNT >= HEIGHT);
        while(REG_VCOUNT < HEIGHT);
        for(int y=0; y < HEIGHT-1; y++) {
            for (int x=1; x < WIDTH-1; x++) {
            int group_val = 0;
            if (vram[(x-1) + WIDTH * y] != 0) { group_val += 4;}
            if (vram[x + WIDTH * y] != 0) { group_val += 2;}
            if (vram[(x+1) + WIDTH * y] != 0) { group_val += 1;}

            if (rule & 1 << group_val) {
                vram[x + WIDTH * (y + 1)] = color15(31, 0, 0);
            }
            }
        }

        break;
    }

    return 0;
}

u16 color15(u16 r, u16 g, u16 b) {
    return r | g << 5 | b << 10;
}
Run and Finish
Compile and run and you'll see the rule 30 pattern. Try other "rules" and see what patterns you can get.
VisualBoy Advance