Nodes

Like I mentioned in the previous section, Pacman is currently able to move anywhere he wants to move. This isn't the kind of movement we want though. If you've played Pacman before, and I'm sure you have if you're reading this, then you know that he can only move around within a maze. So we need to figure out a way to constrain his movement. When I first wrote a Pacman game I did this by checking for wall collisions. I defined the maze to be a bunch of walls and checked if Pacman was colliding with the walls and basically just keeping him in between the walls. This may seem like a good solution, but it's not. I ran into a lot of issues that I won't discuss here, but I eventually thought of a way better method. That method is defining the maze as a map of connected nodes. That was a huge revelation for me and it solved all of the issues I was facing with collision detection. I'll go over what I mean by a "map of connected nodes" below and we'll generate a simple maze for Pacman to traverse as we're learning the basics of this.

Maybe you've studied data structures, but it's more than likely you haven't. That's fine, you don't need a degree in computer science to understand this stuff, I don't have one. Let's start off with defining what a Node is. A Node is really anything you want it to be. It's a very abstract thing. It's basically an abstract object that contains information. Usually when you're talking about nodes in video games, one of the most important pieces of information is the position of the node. You can also represent a node any way you like, we're going to represent a node as a red circle. Nodes by themselves aren't that interesting. They become way more interesting when you start linking them up together. When we have two nodes that are directly linked together we say that they are neighbors. Being a neighbor to any particular node has nothing to do with proximity. Two nodes can be right next to each other, but if they are not linked together, then they are not neighbors. If two nodes are connected to each other, then they are connected by a path. We'll represent a path by a straight line that joins two nodes together. That's how we can know visually that two nodes are connected to each other. When you have a bunch of nodes linked together in various ways, then that is called a node map. You've probably seen node maps before, they can be used in various ways. For example, representing a network of computers like the internet. Our node map that we'll make for our game will be a simplified version. The main restriction we'll place on our node map is that each node can only have a maximum of 4 neighbors. This is because Pacman can only move in four directions: UP, DOWN, LEFT, and RIGHT. So a node can be connected to four other nodes in those four directions. Also a node can only have a maximum of one neighbor in any one direction. By that I mean a node cannot be connected to two or more nodes to the RIGHT of him, for example. If he is connected to a node on his RIGHT, there can only be one node to his RIGHT.


Node Neighbors

Nodes


More Colors

We need to add these to the constants.py file. RED will be the color of the nodes and WHITE will be the color of the paths between the nodes.

constants.py

                          
WHITE = (255, 255, 255)
RED = (255, 0, 0)


New Constants

In order to get some nodes up on the screen we'll start by creating a Node class. We'll create a file called nodes.py and add that class to it. Start by putting in the three imports.

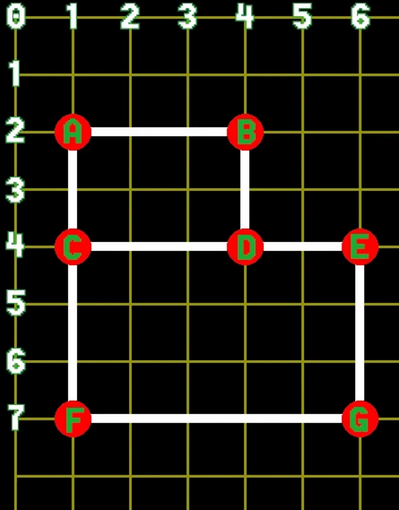
When we create a Node we pass in the row and column values and then compute the x and y position we want to place the Node on the screen. We'll keep all of the neighbor nodes in a list. Initially, when creating the Node object, this list is empty. We'll fill it in later.

We have two methods for adding neighbors to our Node object. If we just need to add a single node then we can call the addNeighbor method. In that method we'll check to make sure that node doesn't already exist in our neighobrs list. We also have another add method that allows us to add more than one neighbor at a time. This is basically a convenience method, and it essentially just calls our other add method for all of the neighbors in our list. Just makes it easier on us instead of having to call the addNeighbor method multiple times ourselves.

Then all we need to do is render the Node so it appears on the screen. We draw all of the paths to the neighbors first as WHITE lines, and we draw the Node itself as a RED circle. When we're finished with the game we don't actually draw the nodes, but we draw them now while we're developing the game.

nodes.py

                          
import pygame
from constants import *

class Node(object):
    def __init__(self, x, y):
        self.position = pygame.Vector2(x, y)
        self.neighbors = []

    def addNeighbor(self, node):
        if node not in self.neighbors:  self.neighbors.append(node)

    def addNeighbors(self, nodelist):
        for node in nodelist:  self.addNeighbor(node)

    def render(self, screen):
        for node in self.neighbors:
            pygame.draw.line(screen, WHITE, self.position, node.position, 4)
            pygame.draw.circle(screen, RED, self.position, 12)


NodeGroup Class

Having a Node class is great when dealing with individual nodes, but we're going to be dealing with a lot of nodes. It would be better if we grouped all of the nodes together so let's create another class in the nodes.py file where we actually create all of the individual nodes. This class needs to be placed after the Nodes class.

We're going to keep all of our Node objects in a list called nodeList, which starts out empty.

After we create our NodeGroup object we'll call a method called setupTestNodes which is just a temporary method we're using to show how we manually create and link up the nodes together. Then, after the nodes have been created, we need to link them up together by adding them to each others neighbors list as shown in the example image above. Finally, we add all of the nodes to the NodeGroup's nodeList.

When we want to draw all of the nodes we call the render method which just loops through the nodeList and calls each nodes render method.

nodes.py

                          
class NodeGroup(object):
    def __init__(self):
        self.nodeList = []

    def setupTestNodes(self):
        nodeA = Node(80 ,80)
        nodeB = Node(160, 80)
        nodeC = Node(80, 160)
        nodeD = Node(160, 160)
        nodeE = Node(208, 160)
        nodeF = Node(80, 320)
        nodeG = Node(208, 320)

        nodeA.addNeighbors([nodeB, nodeC])
        nodeB.addNeighbors([nodeA, nodeD])
        nodeC.addNeighbors([nodeA, nodeD, nodeF])
        nodeD.addNeighbors([nodeB, nodeC, nodeE])
        nodeE.addNeighbors([nodeD, nodeG])
        nodeF.addNeighbors([nodeC, nodeG])
        nodeG.addNeighbors([nodeE, nodeF])

        self.nodeList = [nodeA, nodeB, nodeC, nodeD, nodeE, nodeF, nodeG]

    def render(self, screen):
        for node in self.nodeList:
            node.render(screen)


Check Valid Key Presses

Now that we have the NodeGroup class written we can create an instance of it in the GameController class. So make the following changes to the run.py file.

In order to use the NodeGroup class we'll need to import it first. Add this import to the top of the run.py file with the rest of the imports.

These two lines need to be added to the startGame method. Place them before creating the Pacman object. The order doesn't matter right now, but it will later.

Finally, we want to draw the nodes to the screen. Add this to the render method. The order in which you place things here matter. It depends if you want objects to appear on top or behind other objects. Place this code before drawing the Pacman object so that Pacman will appear in front of the nodes. But make sure you place it after drawing the black background, otherwise the background will cover the nodes and you'll think something is wrong since there won't be any nodes on the screen.

run.py

                          
from nodes import NodeGroup

def startGame(self):
    self.setBackground()
    self.nodes = NodeGroup()
    self.nodes.setupTestNodes()
    self.pacman = Pacman()

def render(self):
    self.screen.blit(self.background, (0,0))
    self.nodes.render(self.screen)
    self.pacman.render(self.screen)
    pygame.display.update()


Run and Finish

When you run the code you'll see the nodes along with the lines between the nodes to show how they are linked together. If you don't see the links or they are linked in unexpected ways, then check your code to make sure each node is linking to the correct neighbor node. Currently it's just a visual difference. Pacman can't interact with the nodes right now. But in the next section I'll show you how to restrain Pacman to move only along these nodes and paths.

Blank Screen


Download

You can download the files up to this point by clicking on the following folder.

Blank Screen